Want a quick and easy way to play around with deep learning libraries? Puny GPU got you down? Thanks to Amazon Web Services (AWS) — specifically, AWS Elastic Compute Cloud (EC2) — no data scientist need be left behind.
Jupyter/IPython notebooks are indispensable tools for learning and tinkering. This post shows how to set up a public Jupyter notebook server in EC2 and then access it remotely through your web browser, just as you would if you were using a notebook launched from your own laptop.
For a beginner, having to both set up deep learning libraries and navigate the AWS menagerie feels like getting thrown into the deep end when you just want to stick a toe in. You can skip the hassle of setting up deep learning frameworks from scratch by choosing an Amazon Machine Image (AMI) that comes pre-installed with the libraries and their dependencies. (Concerned about costs? — see the note* at the bottom of this post.)
For example, the Stanford class, CS231n: Convolutional Neural Networksfor Visual Recognition, has provided a public AMI with these specs:
- cs231n_caffe_torch7_keras_lasagne_v2
- AMI ID: ami-125b2c72 in the us-west-1 region
- Use a g2.2xlarge instance.
- Caffe, Torch7, Theano, Keras and Lasagne are pre-installed. Python bindings of caffe are available. It has CUDA 7.5 and CuDNN v3.
If you’re new to AWS, CS231n provides a nice step-by-step AWS tutorial with lots of screenshots. We’re just going to tweak their procedure to enable access to Jupyter/IPython notebooks.
After you’re done, you’ll be able to work through tutorials in notebook format like those provided by caffe in their examples folder, e.g. 00-classification.ipynb.
We’ve written a little bash script jupyter_userdata.sh to execute Jupyter’s instructions for setting up a public notebook server, so you don’t have to manually configure the notebook server every time you want to spin up a new AMI instance.
For the script to work, Jupyter itself should already be installed — which it is in the CS231n AMI.
You just have to edit the password in the script. To generate a hashed password, use IPython:
In [1]: from notebook.auth import passwd
In [2]: passwd()
Enter password:
Verify password:
Out[2]: 'sha1:bcd259ccf...<your hashed password here>'
Replace the right hand side of line 24 in the script with the hashed password you just generated.
Then, follow these steps to launch an EC2 instance.
1. First, follow the CS231n AWS tutorial up until the step “Choose the instance type g2.2xlarge, and click on “Review and Launch”.
Don’t click on “Review and Launch” yet!
2. Here’s where we add a couple extra steps to the tutorial.**
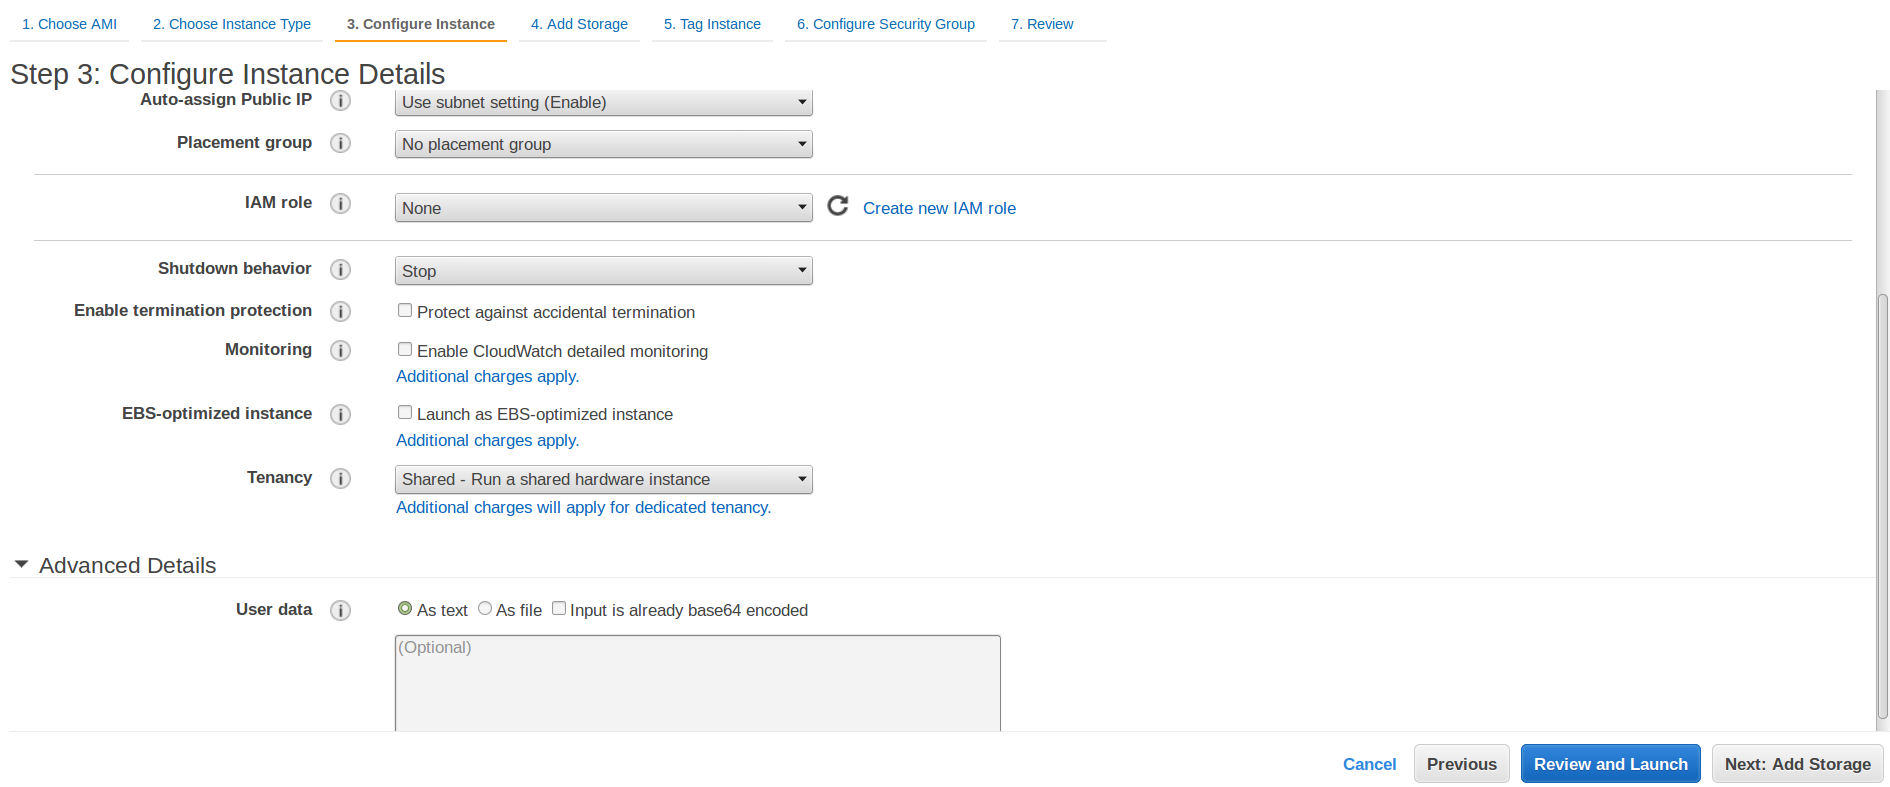
We’re going to supply the shell script as user-data, a way to pass in scripts to automate configurations to your AMI. Instead of clicking on “Review and Launch”, click on the gray button in the lower right “Next: Configure Instance Details”.
In the next page, click on the arrowhead next to “Advanced Details” to expand its options. Click on the radio button next to “As text”, then copy and paste the text from jupyter_userdata.sh (modified with your password) into the field.
Warning: if you click on “As file” instead and browse to wherever you saved jupyter_userdata.sh, the file must first be base64-encoded.
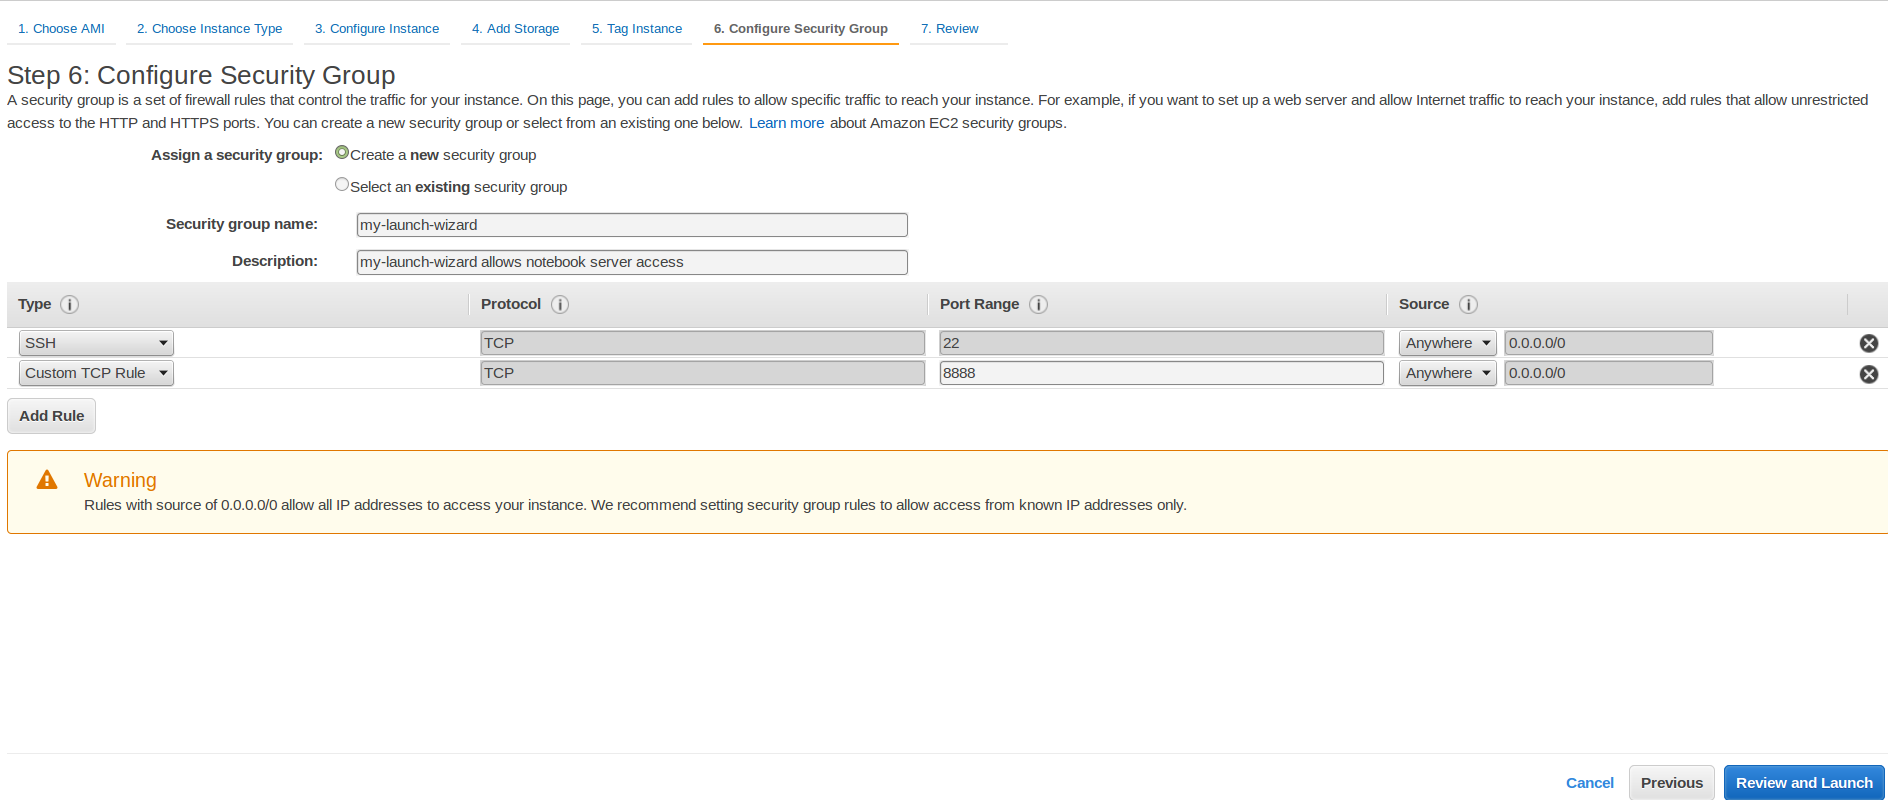
3. Next, (skipping steps 4. and 5.) click on the link to “6. Configure Security Group” near the top of the page. By default, SSH is enabled, but we need to enable access to the notebook server, whose port we’ve set as 8888 in the bash script.
Click on the grey button “Add Rule”, then for the new rule, choose Type: Custom TCP Rule; Protocol: TCP; Port Range: 8888; Source: Anywhere.
4. Now, pick up where you left off in the CS231n tutorial (“… click on “Review and Launch“.), which takes you to “Step 7. Review Instance Launch”. Complete the tutorial.
Check that the Jupyter notebook server was set up correctly:
- ssh into your instance (see CS231n instructions).
- Navigate to
~/caffe/examples. - Start the notebook server using the
jupyter notebookcommand. -
In your web browser, access the notebook server with https://PUBLIC_IP:8888, where PUBLIC_IP is the public IP of your instance, displayed from the instance description on your AWS dashboard. Your browser will warn that your self-signed certificate is insecure or unrecognized.
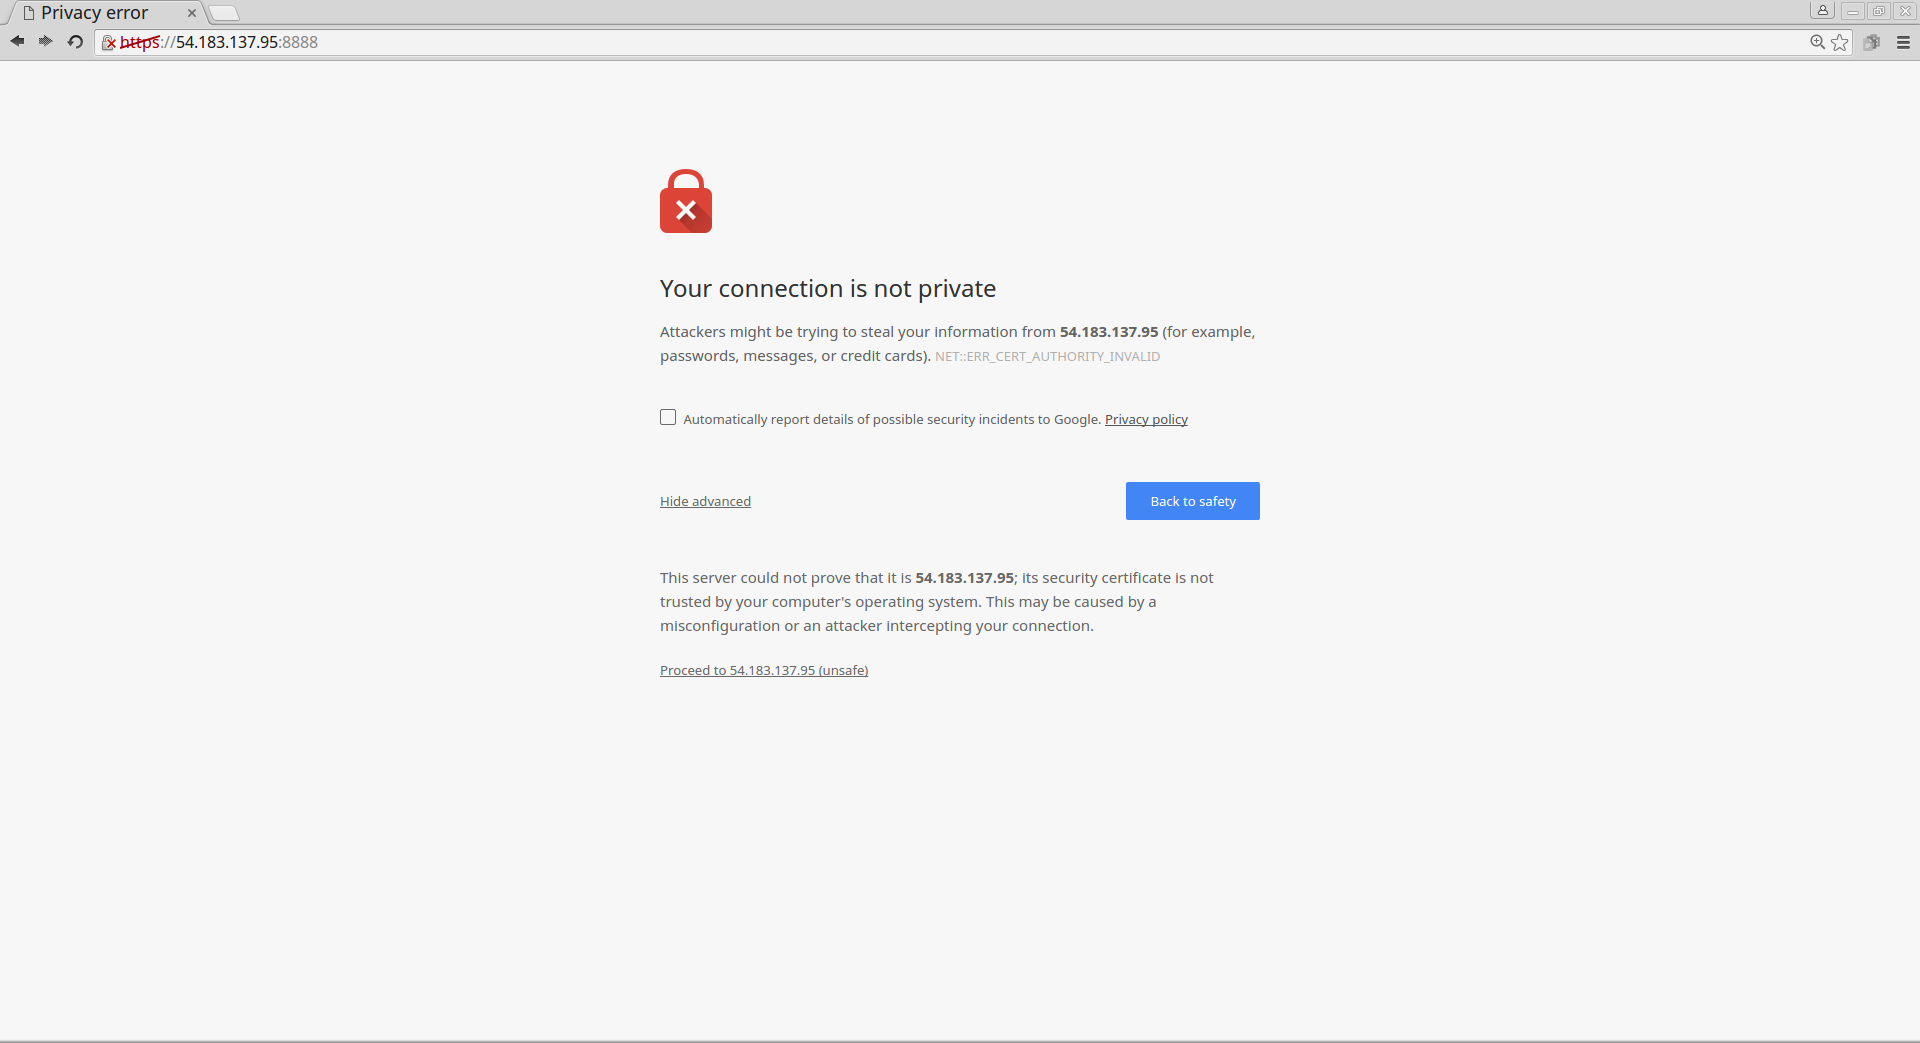
That’s ok — click past the warnings, and you should get a sign-in page. Type in your password.
-
Next, you should see the files and directories in
/home/ubuntu/caffe/examples - Open one of the example notebooks, e.g.
00-classification.ipynb, and try running some cells to make sure everything is working.
Voila! We hope this guide removes some obstacles to getting started. Happy learning!
- The cost of running a GPU instance is high compared to many other instance types, but still very reasonable if you’re just tinkering for a few hours on a pre-trained model, not training a whole neural network from scratch.
Check out the pricing for an EC2 instance in the section “On-Demand Instance Prices” and selecting the region of your AMI. At the time of writing, the cost of an on-demand g2.2xlarge instance in the US West (Northern California) region was $0.7/hour, whereas the price of a spot instance (a cheaper alternative which will automatically terminate when the spot pricing exceeds your bid) was $0.3/hour.
If you followed the CS231n tutorial exactly and forgot to supply user data, you can still use this script. First modify the security configuration of your instance according to step 3**. Then use the scp command to copy the script from your local computer to your instance, ssh into your instance, then execute the script: source jupyter_userdata.sh. If you need help with using scp, see “To use SCP to transfer a file” in this guide.
 Cathy Yeh got a PhD at UC Santa Barbara studying soft-matter/polymer physics. After stints in a translational modeling group at Pfizer in San Diego, Driver (a no longer extant startup trying to match cancer patients to clinical trials) in San Francisco, and Square, she is currently participating in the OpenAI Scholars program.